EverQuest Tutorial
- All You Need to Know About
Dyes -
As many of you know, I am an avid player of EverQuest, and as
of the new Legends of Ykesha expansion, armor dyes were introduced
into the game. This a tutorial I wrote for my guild (Knights
of Namaskar) and friends about how to
get them, make them, and use them.
You've heard about the new dyes, and maybe you've seen
them, too - and you probably want them now (or not, but just play
along). So, where to start?
DIRECTIONS TO COMPONENTS:
First, you need to buy the dyes. Get a teleport from someone to
Stonebrunt Mountains. Once you zone in, head east to the shore, then
follow it north to a dock with a boat. Touch the door of the boat in
order to zone into the Gulf of Gunthak. The run takes about 20 seconds,
and you probably won't need invisibility.
Now that you're in Gunthak, run straight ahead to a tall building, the
lighthouse. At the back of the lighthouse is a banker. There is also a
vendor (to the left when you walk in) that sells as the top four items a
prism shard, glaze lacquer, unfired vial, and a quality firing
sheet.
You'll need all four of these to dye one dye slot. The costs are pretty
much 9pp, 11pp, 11pp, and 1pp, so you'll need about 30pp to dye, and
remember, that's per slot (bracers only take a single dye job, NOT two).
INSTRUCTIONS:
Take the
unfired vial
and the
quality firing sheet
and place them in a kiln. You'll need about 50 pottery skill for it to
combine trivially (is that a word?) to get a
dye vial
. Then head for a brewing barrel or use something with a similar effect
with the
prism shard
and
glaze lacquer
to make a
prismatic dye
.
Place the dye vial and prismatic dye into the brewing barrel again and
combine. You'll need 125 brewing skill to make this trivial, then you'll
get a
vial of prismatic dye
.
APPLYING THE DYE:
You may now dye a dye slot any color that you wish. How? Go to your
Inventory and look for the new 'Dye' button at the bottom. Your view
should change to focus on your chraracter, and then a new window will
pop-up called
Armor Dye
. The picture below is what will appear.
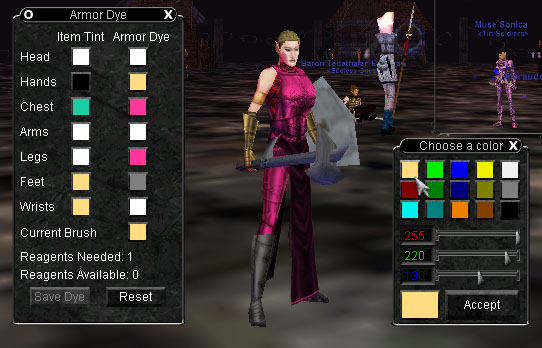
The little boxes under Item Tint are the colors of the original items
and cannot be changed. The little boxes under Armor Dye are the
adjustable ones. Click on any of the boxes to bring up the window called
'Choose a color', which is also shown in the picture.
You'll see boxes of colors, these are default colors that you can use as
starting points for customization. Below are sliders for adjusting the
colors. To the left of the sliders are colors that are being adjusted -
red, green, and blue. Notice these values are in numerical format. If
you change the number in the box, you will accordingly change the
intensity/brightness of the color. 0 is the lowest value, and 255 is the
highest.
Examples:
0, 0 ,0 = black;
255, 255, 255 = white;
255, 0 , 0 = intense red;
255, 175, 175 = a very light value of red (probably a whitish pink);
25, 25, 25 = a very dark value of gray;
100, 25, 25 = a dark value of red
You'll notice in my examples a trend: I like to end numbers with 0 or 5.
This makes it somewhat easier to remember when you copy numbers down
later (but we'll get to that in a moment).
If you like the color of a piece of armor you already possess (I.E.,
Rel's golden cleric armor), place your cursor over the Item Tint box of
the appropriate color and you'll be given it's RGB values.
CURRENT BRUSH Tool:
In the armor dye window, you'll notice the lone color labeled Current
Brush. If you change the value of this color, it will replace the light
red color of the 'Choose a Color' window with whatever value you set the
brush to. This way you don't have to retype the values everytime if you
make a set completely of one color. If you look in the picture, I
already made the current brush Relaris' golden armor color, and it
accordingly appears in the top left box of the 'Choose a Color' window.
When you finish, check the number of Reagents Needed with the number of
Reagents Available. If you've got enough (don't know what happens if
not), hit Save Dye and all the changes will be made and reagents
deducted. You may dye multiple slots at once.
Note, you may also reset the process before saving the dye, however
sometimes the colors will set to values you fiddled with before. If
you're worried about this, zone and it will reset all the dyeing data in
the windows and on your character.
IMPORTANT NOTE
:
If you own any white armor, dye it another color, and use the default
white, it will request a reagent. Why? The value of the default white is
240, 240, 240, but your white armor is set to a value of 255, 255, 255.
Either reset the dye window, set the color manually to 255's (though
this may not be safe), or zone to fix this before proceeding. Don't
waste money on extra dyes! This also applies to trying to reset a color
back to it's original value (changing Relaris' cleric armor, and then
trying to change it back). It will count a reagent and in this case you
MUST use the reset function or zone.
TIPS:
--Now, remember to copy down the numbers you use for dyeing armor. Why?
See the 'nice' shade of pink Relaris is wearing? Let's say I want to
make her entire armor set that color. By writing down the RGB value for
that color, I can easily repaint all the other parts of the armor that
value without making guesses, approximations, or having to redye
everything over again. Also, by having numbers that end in 5 and 0, you
don't have to worry about remembering strange numbers like 173, 182,
168. Trust me, the color is almost exactly the same if you change them
all to 175, 180, 170, and it's that much easier to copy.
--You do NOT have to have components to dye armor. You can play around
with colors any time you want to, but they will disappear upon zoning
and no one else can see them until you complete the dye. You may,
however, take a screenshot and show it off if you're low on cash and
want opinions first.
--The dyes work with BOTH Luclin and non-Luclin graphics, as shown
below.


And there you have... a rainbow suit of armor??? Poor Wallin, so fashion
challenged... okay, let's do some adjusting here.

Ahhhh, much better. And there you have it! If you would like any of the
dye colors shown for your own armor, message me in the game and I'll set
you the RGB values. Thank you for reading my tutorial on dyes!
Other Guides Worth Reading
Map Tutorial: You're Lost Until
You've Read This
